# 高级特性
# Handlers
(TODO)
Such as: AfterArgParsed, AutomaticEnvHooks, ConfigLoadedListener, CustomShowBuildInfo, CustomShowVersions, ...
# 智能建议
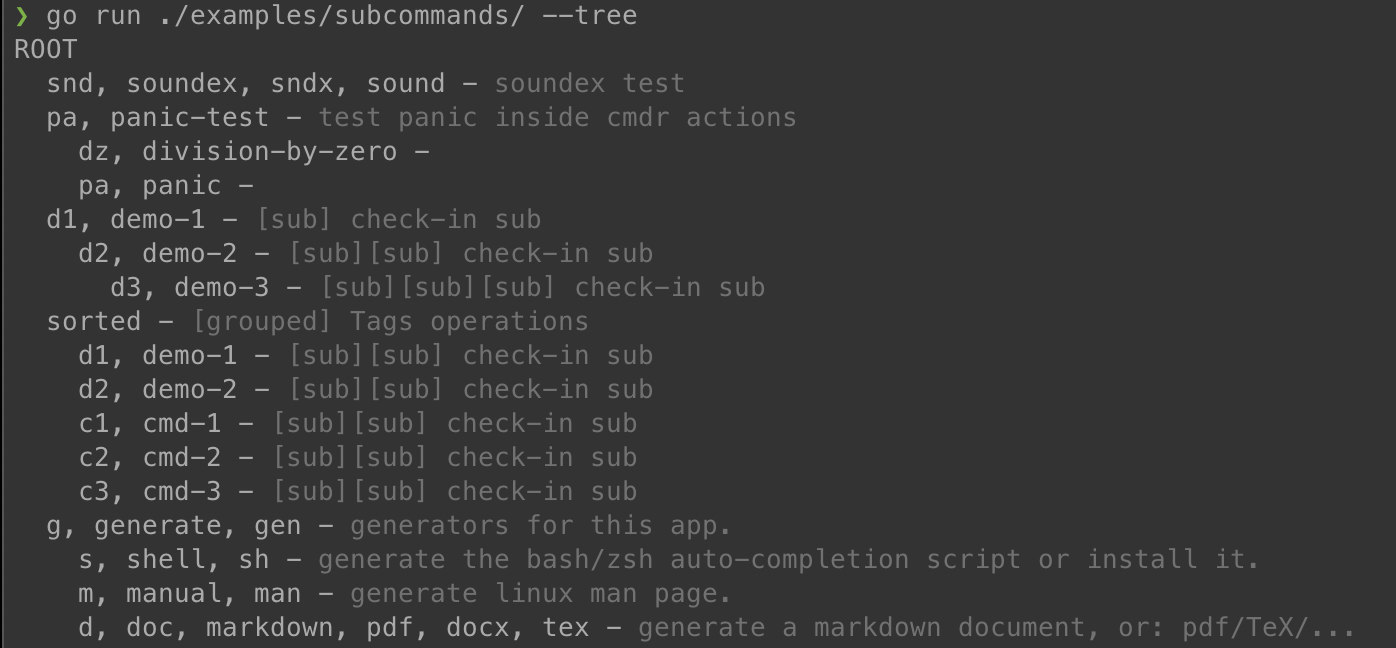
在用户输入了错误的命令(Command)、标志(Flag)时,cmdr 会停止进一步的解析,报错、并提出智能推断和建议。借助 subcommand 示例程序我们可以观察一下这个特性:
❯ go run ./examples/subcommands/ --tree
ROOT
  snd, soundex, sndx, sound - soundex test
  pa, panic-test - test panic inside cmdr actions
    dz, division-by-zero -
    pa, panic -
  d1, demo-1 - [sub] check-in sub
    d2, demo-2 - [sub][sub] check-in sub
      d3, demo-3 - [sub][sub][sub] check-in sub
  sorted - [grouped] Tags operations
    d1, demo-1 - [sub][sub] check-in sub
    d2, demo-2 - [sub][sub] check-in sub
    c1, cmd-1 - [sub][sub] check-in sub
    c2, cmd-2 - [sub][sub] check-in sub
    c3, cmd-3 - [sub][sub] check-in sub
  g, generate, gen - generators for this app.
    s, shell, sh - generate the bash/zsh auto-completion script or install it.
    m, manual, man - generate linux man page.
    d, doc, markdown, pdf, docx, tex - generate a markdown document, or: pdf/TeX/...

❯ go run ./examples/subcommands/ pan
subcommands is an effective devops tool by hedzr - v1.0.0

Usages:
    subcommands [Commands] [tail args...] [Options] [Parent/Global Options]

Description:
    subcommands is an effective devops tool. It make an demo application for `cmdr`.

Examples:

    $ subcommands gen shell [--bash|--zsh|--auto]
      generate bash/shell completion scripts
    $ subcommands gen man
      generate linux man page 1
    $ subcommands --help
      show help screen.


Commands:
  [Grouped]
  sorted                                     [grouped] Tags operations
  [Nested]
  d1, demo-1                                 [sub] check-in sub
  [Test]
  pa, panic-test                             test panic inside cmdr actions
  snd, soundex, sndx, sound                  soundex test
  [Misc]
  g, generate, gen                           generators for this app.

Options:
  [Misc]
      --config=[Locations of config files]   load config files from where you specified (default [Locations of config files]=)
  -q, --quiet                                No more screen output. [env: QUITE] (default=false)
  -v, --verbose                              Show this help screen [env: VERBOSE] (default=false)

Type '-h'/'-?' or '--help' to get command help screen.
More: '-D'/'--debug'['--env'|'--raw'|'--more'], '-V'/'--version', '-#'/'--build-info', '--no-color', '--strict-mode', '--no-env-overrides'...

Unknown command: pan
  - do you mean: pa
  - do you mean: panic-test
2
3
4
5
6
7
8
9
10
11
12
13
14
15
16
17
18
19
20
21
22
23
24
25
26
27
28
29
30
31
32
33
34
35
36
37
38
39
40
41
42
43
44
45
46
47
48
49
50
51
52
53
54
55
56
57
58
59
60
61
62
63
可以见到,对于未知命令 “pan” 而言,cmdr 给出了两个意见,这或许能有助于用户解决自己的问题。
对于未知标志来说也是相似的。
# 算法内幕
cmdr 早期采用 soundex 算法进行相似度判定。
自从 cmdr v1.1.3 开始,我们使用更强大的 Jaro-Winkler distance (opens new window) 算法来提供更精准的建议。所以你会看到现在的建议值更符合期待。
# 定制智能建议相似度
Jaro-Winkler distance (opens new window) 算法对单词计算出一个浮点数来表示相似程度,这个值越接近 1.0 则表示相似度越高。cmdr 则使用一个阈值来决定两个单词是不是“相似的”。这个阈值默认为 0.6666666666666666。
可能从实际使用效果来看,这个阈值是相当合理的。但我们总是知道,这无法令所有人满意。所以你可以通过 WithSimilarThreshold(similarThreshold) 来调整这个阈值。
// WithSimilarThreshold defines a threshold for command/option similar detector.
// Default threshold is 0.6666666666666666.
// See also JaroWinklerDistance
func WithSimilarThreshold(similarThreshold float64) ExecOption {
	return func(w *ExecWorker) {
		w.similarThreshold = similarThreshold
	}
}
2
3
4
5
6
7
8
效果当然是见仁见智的。
# 定制智能建议行为
通过 WithUnknownOptionHandler 你可以指定一个错误选项捕获函数,然后自行决定应该如何向用户反馈该错误:
type (
	// UnknownOptionHandler for WithSimilarThreshold/SetUnknownOptionHandler
	UnknownOptionHandler func(isFlag bool, title string, cmd *Command, args []string) (fallbackToDefaultDetector bool)
)

func WithUnknownOptionHandler(handler UnknownOptionHandler) ExecOption {
	return func(w *ExecWorker) {
		unknownOptionHandler = handler
	}
}
2
3
4
5
6
7
8
9
10
11
你可以编写一个 UnknownOptionHandler 函数然后返回 false 来拒绝默认的智能建议内容,这样你的反馈就是唯一的给用户的信息。
func myUnknownOptionHandler func(isFlag bool, title string, cmd *Command, args []string) (fallbackToDefaultDetector bool) {
  print("halo terrible")
  return
}

// ...
err = cmdr.Exec(buildRootCmd(),
                WithUnknownOptionHandler(myUnknownOptionHandler),
               )
2
3
4
5
6
7
8
9
# Panics
panic 的相关测试可以这样:
go run ./examples/panics pa pa # panic test
go run ./examples/panics pa pa --enable-ueh # panic test with UnhandledExceptionHandler
go run ./examples/panics pa dz # divide by zero
2
3
# onUnhandledErrorHandler
cmdr 内置了 recover 机制并将错误打包后返回到 Exec() 的调用者,但对于 onUnhandledError 可以单独处理:
package main

import (
	"fmt"
	"github.com/hedzr/cmdr"
	cmdr_examples "github.com/hedzr/cmdr-examples"
	"github.com/hedzr/cmdr/tool"
	"github.com/hedzr/logex/logx/logrus"
	"gopkg.in/hedzr/errors.v2"
)

func main() {
	Entry()
}

func Entry() {
	if err := cmdr.Exec(buildRootCmd(),
		cmdr.WithLogx(logrus.New("debug", false, true)),
		cmdr.WithUnhandledErrorHandler(onUnhandledErrorHandler),
	); err != nil {
		cmdr.Logger.Fatalf("error: %+v", err)
	}
}

func onUnhandledErrorHandler(err interface{}) {
	if cmdr.GetBoolR("enable-ueh") {
		dumpStacks()
		return
	}

	panic(err)
}

func dumpStacks() {
	fmt.Printf("=== BEGIN goroutine stack dump ===\n%s\n=== END goroutine stack dump ===\n", errors.DumpStacksAsString(true))
}

// ...
2
3
4
5
6
7
8
9
10
11
12
13
14
15
16
17
18
19
20
21
22
23
24
25
26
27
28
29
30
31
32
33
34
35
36
37
38
这意味着当业务逻辑代码产生了异常时,你可以选择自己喜欢的提示方式。
# 和 hedzr/log 的整合
# 最小的 Logger 接口
hedzr/log (opens new window) 是一个小型库,它提供了一个 logger 所必需的通用接口:
# Logger
// Logger is a minimal logger with no more dependencies
	Logger interface {
		Tracef(msg string, args ...interface{})
		Debugf(msg string, args ...interface{})
		Infof(msg string, args ...interface{})
		Warnf(msg string, args ...interface{})
		Errorf(msg string, args ...interface{})
		Fatalf(msg string, args ...interface{})
		Printf(msg string, args ...interface{})

		SetLevel(lvl Level)
		GetLevel() Level

		// Setup will be invoked once an instance created
		Setup()

		// AsFieldLogger() FieldLogger
	}
2
3
4
5
6
7
8
9
10
11
12
13
14
15
16
17
18
# LoggerConfig
此外,一个专用的配置结构为:
	// LoggerConfig is used for creating a minimal logger with no more dependencies
	LoggerConfig struct {
		Enabled   bool
		Backend   string // zap, sugar, logrus
		Level     string
		Format    string // text, json, ...
		Target    string // console, file, console+file
		Directory string
		DebugMode bool `json:"-" yaml:"-"`
		TraceMode bool `json:"-" yaml:"-"`

		// MaxSize is the maximum size in megabytes of the log file before it gets
		// rotated. It defaults to 100 megabytes.
		MaxSize int `json:"maxsize" yaml:"maxsize"`

		// MaxAge is the maximum number of days to retain old log files based on the
		// timestamp encoded in their filename.  Note that a day is defined as 24
		// hours and may not exactly correspond to calendar days due to daylight
		// savings, leap seconds, etc. The default is not to remove old log files
		// based on age.
		MaxAge int `json:"maxage" yaml:"maxage"`

		// MaxBackups is the maximum number of old log files to retain.  The default
		// is to retain all old log files (though MaxAge may still cause them to get
		// deleted.)
		MaxBackups int `json:"maxbackups" yaml:"maxbackups"`

		// LocalTime determines if the time used for formatting the timestamps in
		// backup files is the computer's local time.  The default is to use UTC
		// time.
		LocalTime bool `json:"localtime" yaml:"localtime"`

		// Compress determines if the rotated log files should be compressed
		// using gzip. The default is not to perform compression.
		Compress bool `json:"compress" yaml:"compress"`
	}
2
3
4
5
6
7
8
9
10
11
12
13
14
15
16
17
18
19
20
21
22
23
24
25
26
27
28
29
30
31
32
33
34
35
36
37
hedzr/log (opens new window) 所提供的 Logger 的最小化接口,有利于你采用自己喜欢的 Logger 后端。
# log.Debugf, ...
在 hedzr/log (opens new window) 中,提供了一组 package-level 的函数如 Debugf (opens new window), Errorf (opens new window),Fatalf (opens new window),Infof (opens new window), Warnf (opens new window) 等等,它们是被固定封装到 go "log" 的函数。
这组函数允许你通过全局方式进行日志输出,如果你不介意后端总是 “log” 的话。
# 内置 Loggers
# hedzr/log
事实上,hedzr/log 内置了两个基本的 Logger:
std := log.NewStdLogger()
dummy := log.NewDummyLogger()
2
std 是一个 go log 的包装。
dummy 是一个特殊的 logger,向它发出的日志全数都被抛弃。所以它被用于实现 log.OffLevel 特性。
# cmdr.Logger
在 cmdr 系统中,现在已经内置了一个 package 级别的 Logger 变量。
当你使用 cmdr.WithLogx(logger) (opens new window) 时,你实际上是在向这个包级别的变量赋值。
// Logger for cmdr
var Logger log.Logger = log.NewDummyLogger()
2
该变量的默认值是 dummyLogger,什么也不打印出来。
所以在全局,你可以借助它进行日志输出:
cmdr.Logger.Fatalf("%v", err)
# 和 hedzr/logex 相整合
通过 hedzr/logex 我们也提供了面向 logrus / zap 的 log.Logger 封装,你可以直接使用:
import (
	"github.com/hedzr/cmdr"
	"github.com/hedzr/log"
	"github.com/hedzr/logex/build"
	"gopkg.in/hedzr/errors.v2"
)

func Entry() {
	if err := cmdr.Exec(buildRootCmd(),
		// cmdr.WithLogx(logrus.New("debug", false, true)),
		cmdr.WithLogx(build.New(log.NewLoggerConfigWith(true, "logrus", "debug"))),
	); err != nil {
		cmdr.Logger.Fatalf("error: %+v", err)
	}

	cmdr.Logger.Debugf("hello")
}
2
3
4
5
6
7
8
9
10
11
12
13
14
15
16
17
借助于 build.New(logConfig),你不必关心应该如何与某个 logger 后端完成整合,直接使用就好。
# 直接建立 log.Logger 实例
WithLogx(log.NewDummyLogger()),	// import "github.com/hedzr/log"
WithLogx(log.NewStdLogger()),	// import "github.com/hedzr/log"
WithLogx(logrus.New(...)),		// import "github.com/hedzr/logex/logx/logrus"
WithLogx(sugar.New(...)),		// import "github.com/hedzr/logex/logx/zap/sugar"
WithLogx(zap.New(...)),			// import "github.com/hedzr/logex/logx/zap"
2
3
4
5
通过 hedzr/logex (opens new window) 提供的 logx 特性,你可以透明无感知地创建 logrus, zap, zap sugar 后端。这些后端都经过了必须的配置,不但能够打印出上下文函数名、所在文件位置,也向你提供了真正开箱即用的后端日志记录器。
打印出文件位置,对于使用 GoLand 的小伙伴们将会是很重要的特性。因为无论是在 console 窗口还是 inner Terminal 窗口,你都可以点击文件位置的超链接直达代码相关处以寻找问题的根源。
# 借助于配置文件
LoggerConfig 在 cmdr 中可以通过配置文件映射的方式被构建:
app:
  # autoconfig for logger/logging-system.
  # cmdr will load this configuration and initialize the logging
  # system via build.New(loggerConfig).
  # see also:
  #   cmdr.Logger,
  #   log.LoggerConfig           (hedzr/log)
  #   build.New(loggerConfig)    (hedzr/logex/build)
  logger:
    # The field 'level' will be reset to "debug" while the app
    # is started up within a debugger
    # available levels are:
    #   "disable"/"off", "panic", "fatal", "error", "warn",
    #   "info", "debug", "trace"
    level:  info
    format: text                  # text, json, logfmt, ...
    backend: sugar                # zap, sugar(sugared-zap) or logrus, std, off
    target: console               # console, file
    directory: /var/log/$APPNAME
2
3
4
5
6
7
8
9
10
11
12
13
14
15
16
17
18
19
20
运行该示例需要切换工作目录:
cd ./examples/logging
go run .
2
# 扩展你自己的 Logger
由于 cmdr 最初的动因是源于微服务开发的实际需求,因此我们在 Logging 方面不太重视日志文件输出(但我们确实支持标准的 /var/log/<appname>/<appname>.log)、日志文件切割等场景,而是重视 stdout,stderr 输出能力。这里有两(、三)个理由:
- 在 K8s, Docker 场景中,日志应该被送至标准输出设备,基础设施负责对其重定向
- 在其他类似的场景中,同样是由基础设施来处理日志收集、集中问题,你没有理由自行开发日志旋转等等
高级特性 - 如果你真的需要例如 fluentd 的输出能力,好吧,借助
log.Logger实现一个外包装应该也很容易的。
# Debug 增强
# ~~tree
~~ 会引入一个不包含 Options 前缀的内部命名空间。
~~tree 是一个内置的特殊的命令行参数。它能够以层级缩进的方式打印出你的app的全部子命令列表:
这不仅有利于查找错误编码的关联关系,也有助于最终用户快速掌握 CLI 工具的全貌。
# ~~debug
通过 ~~debug 可以打印出 Option Store 的键值对,这通常有助于帮助你确定配置文件加载问题,命令行参数赋值和识别问题等等。
这个输出内容的一个片段截取如下:
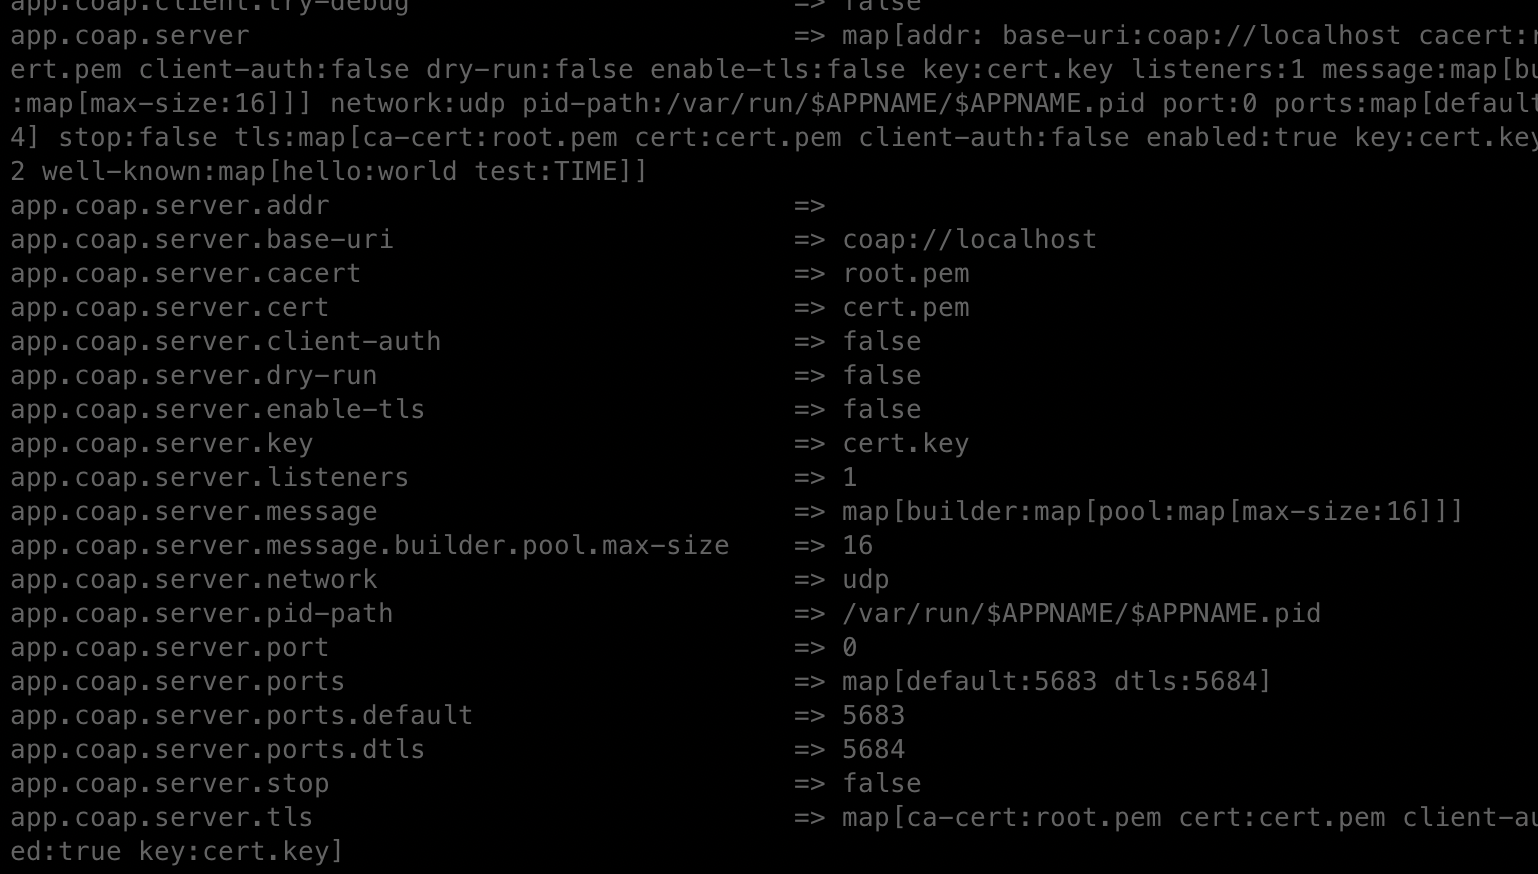
一般来说,输出内容可能都是很长的,请自行尝试。
为了确保 ~~debug 能够被输出并停止 app 运行,通常需要你添加 --help 与其配套。使用与否,由你根据自己的需要实际确定。
有时候你也可能通过一个 timer proc 来打印 OptionStore 的内容,你可以通过 cmdr.DumpXXX 函数来取得一个 yaml 表示的字符串,又或者直接通过 cmdr.GetXXX 抽出具体值。
# Strict 模式
Strict Mode 是一种针对错误和警告的模式,缺省值为未启用(false)。当严格模式被启用时,未知命令和标志会被当作错误(error)而终止进一步的处理。否则在默认状态下,未知命令和标志仅仅会报告一条警告信息,但 cmdr 会尝试继续执行剩余的解析和处理已经解析到的子命令。
除此之外,如果在抽取一个标志的设定值部分出现了错误(例如数据类型不符合切无法自动转换,期待数值但正在抽取一个字母序列等等),也会收到 Strict Mode 的节制。
以下的方式可以启用 Strict 严格模式:
通过指定环境变量
APP_STRICT_MODE=true来运行程序通过内建但隐藏的标志
--strict-mode可以从命令行参数上启用严格模式可以通过配置文件中直接指定:
app:
  strict-mode: true
1
2编程方式在 Exec(root, opts) 中指定:
err = cmdr.Exec(rootCmdr, WithStrictMode(true))1
# Builtin commands and flags
Predefined commands and flags:
- Help:
-h,-?,--help,--info,--usage,--helpme, ... - Version & Build Info:
--version/--ver/-V,--build-info/-#- Simulating version at runtime with
—version-sim 1.9.1 - generally,
conf.AppNameandconf.Versionare originally. ~~tree: list all commands and sub-commands.--config <location>: specify the location of the root config file.- 提供一个顶级的
versions子命令,别名version/ver也可用。
- Simulating version at runtime with
- Verbose & Debug:
—verbose/-v,—debug/-D,—quiet/-q - Generate Commands:
generate shell:—bash/—zsh(todo)/--autogenerate manual: man 1 ready.generate doc: markdown ready.
cmdrSpecials:--no-env-overrides, and--strict-mode--no-color: print the plain text to console without ANSI colors.
# Predefined external config file locations
Predefined external config file locations:
/etc/<appname>/<appname>.ymlandconf.dsub-directory./usr/local/etc/<appname>/<appname>.ymlandconf.dsub-directory.$HOME/.config/<appname>/<appname>.ymlandconf.dsub-directory.$HOME/.<appname>/<appname>.ymlandconf.dsub-directory.all predefined locations are:
predefinedLocations: []string{
	"./ci/etc/%s/%s.yml",       // for developer
	"/etc/%s/%s.yml",           // regular location: /etc/$APPNAME/$APPNAME.yml
	"/usr/local/etc/%s/%s.yml", // regular macOS HomeBrew location
	"$HOME/.config/%s/%s.yml",  // per user: $HOME/.config/$APPNAME/$APPNAME.yml
	"$HOME/.%s/%s.yml",         // ext location per user
	"$THIS/%s.yml",             // executable's directory
	"%s.yml",                   // current directory
},
1
2
3
4
5
6
7
8
9since v1.5.0, uses
cmdr.WithPredefinedLocations("a","b",...),
# Watch conf.d directory
Watch
conf.ddirectory:cmdr.WithConfigLoadedListener(listener)AddOnConfigLoadedListener(c)RemoveOnConfigLoadedListener(c)SetOnConfigLoadedListener(c, enabled)
As a feature, do NOT watch the changes on
<appname>.yml.- since v1.6.9,
WithWatchMainConfigFileToo(true)allows the main config file<appname>.ymlto be watched.
- since v1.6.9,
on command-line:
$ bin/demo --configci/etc/demo-yy ~~debug
$ bin/demo --config=ci/etc/demo-yy/any.yml ~~debug
$ bin/demo --config ci/etc/demo-yy/any.yml ~~debug
1
2
3supports muiltiple file formats:
- Yaml
- JSON
- TOML
cmdr.Exec(root, cmdr.WithNoLoadConfigFiles(false)): disable loading external config files.
# 定制子文件夹
如果不喜欢使用 conf.d 作为将被自动搜索的子文件夹名,你可以替换它:
cmdr.Exec(buildRootCmd(),
          cmdr.WithConfigSubDirAutoName("myapp.d"))
2
.d 后缀是 linux etc 的传统约定,这意味着某个服务、某个功能可以有一组文件被放在这个 .d 的文件夹中,并且将会被自动载入作为配置的一部分。
不过取决于你的系统工作环境以及相应的不同的惯例,你也可以使用别的名字。
# 辅助文件夹
正如你所知的,cmdr 会在一系列的约定位置寻找和主文件相关的配置文件,通常它的名字必须是 <appname>.yml,后缀名可以是其它我们可以识别的名字,例如 .yaml, .json, .toml 等等。一旦找到了主配置文件,我们会检查 conf.d 文件夹中的其它配置文件并依次载入。
除了这个预定义的逻辑之外,cmdr 也允许你激活辅助配置文件(夹)功能:
cmdr.Exec(buildRootCmd(),
          cmdr.WithSearchAlterConfigFiles(true))
2
当此功能被激活时,cmdr 在完成了标准的配置文件搜索逻辑之后,也会检查当前文件夹中的 .<appname>.yml 文件并加载它;此外,cmdr 还检查当前文件夹中的 .<appname>/ 文件夹并尝试加载其中的配置文件,这些配置文件应该有我们可识别的后缀名。
# Help Screen 定制
可以定制你自己的帮助屏幕输出,你可以通过自行实现 cmdr.Painter 接口例如 MyPainter,并将其赋给 ExecWorker.currentHelpPainter (借助 cmdr.WithHelpPainter(painter))即可实现帮助屏的自定义。
这种方式接管了内建的帮助屏幕构造逻辑,灵活度足够大,但工作量也不小。
除此而外,你可以少量地微调现有的帮助屏幕的部分元素。
# 为每个子命令定制尾部参数格式文本
一条子命令的帮助屏通常看起来是这样的:
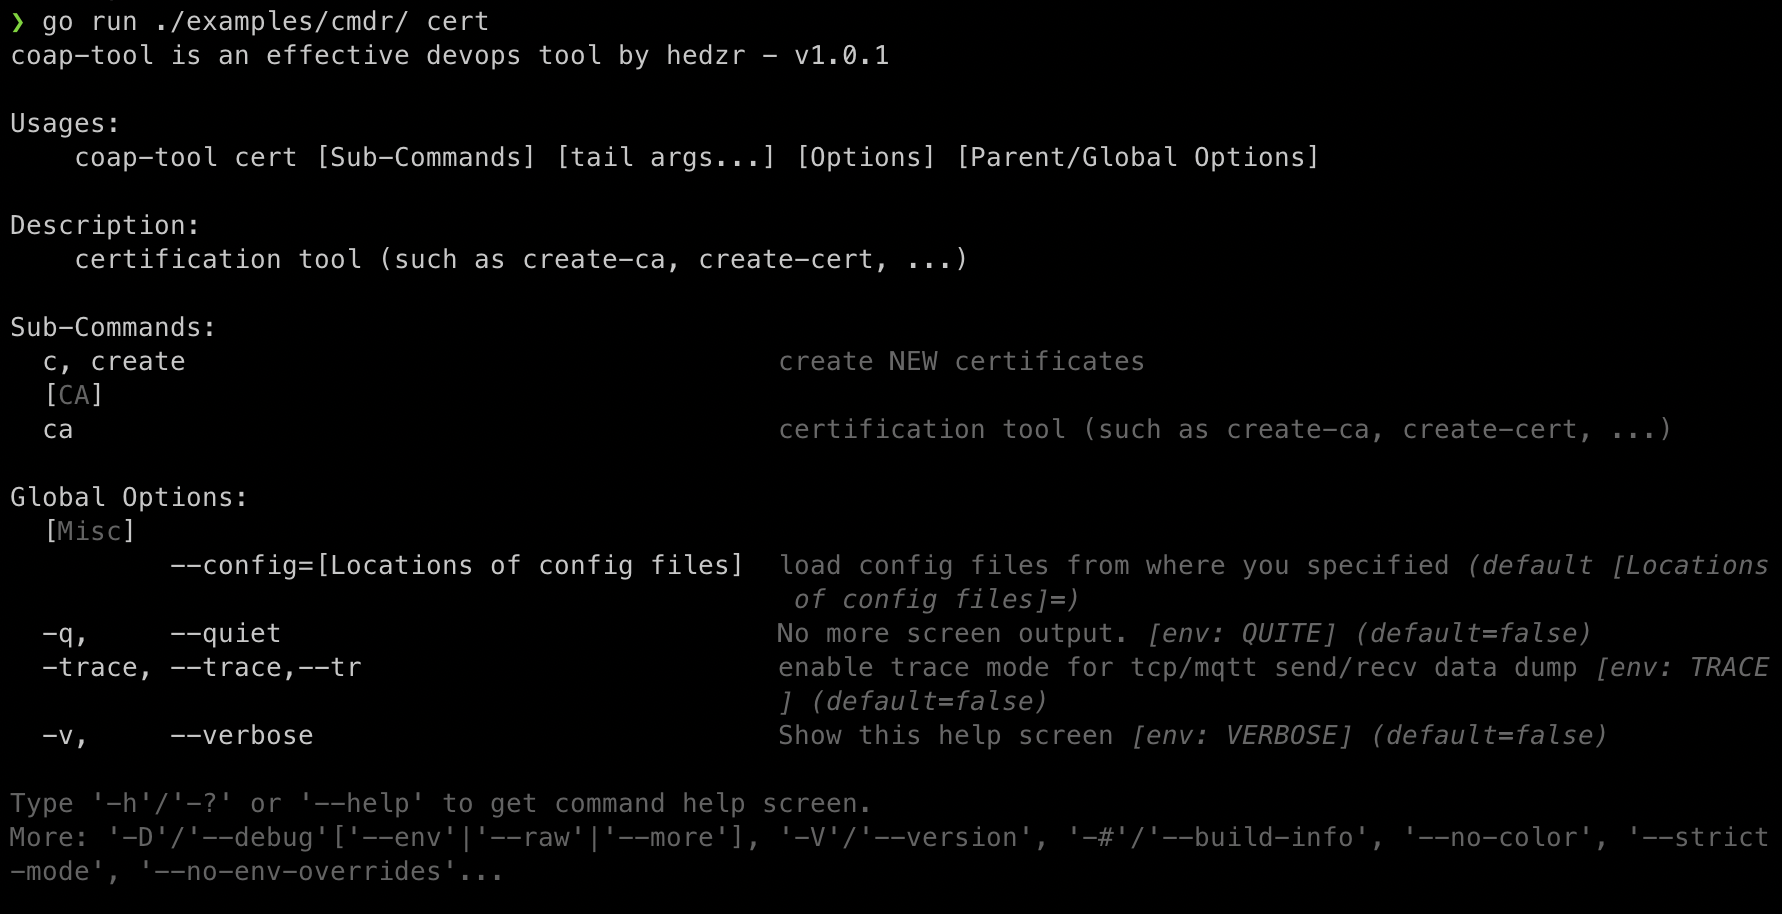
在 Usages 段中,命令行组成部分被显示为 app current-command-series tails 格式。默认时 tails 的文本为 [Sub-Commands] [tail args...] [Options] [Parent/Global Options]。
你可以使用定制这一部分文字,令其符合你的子命令的需要。
certCmd := root.NewSubCommand("create", "c").
		Description("create NEW certification").
    TailPlaceholder(`input-cert-file input-cert-key-file output-cert-file`)
2
3
# 关闭 Help Screen 中的结束段落
在帮助屏幕的末尾,我们打印一段文字来做用法提示,默认时它是这样的:

通过 WithHelpTailLine(line) 你可以取代这段文字。
其原型如下:
// WithHelpTailLine setup the tail line in help screen
//
// Default line is:
//   "\nType '-h' or '--help' to get command help screen."
func WithHelpTailLine(line string) ExecOption {
   return func(w *ExecWorker) {
      w.helpTailLine = line
   }
}
2
3
4
5
6
7
8
9
# 定制命令行参数解析细节
# WithOnSwitchCharHit
在命令行参数解析过程中,如果遇到单独的 "-" 字符,cmdr 会尝试进行回调。你可以通过
WithOnSwitchCharHit(fn) 指定一个相应的回调函数。其原型为:
// WithOnSwitchCharHit handle the exact single switch-char (such as '-', '/', '~') matched.
// For example, type `bin/fluent mx -d - --help` will trigger this callback at the 2nd flag '-'.
func WithOnSwitchCharHit(fn func(parsed *Command, switchChar string, args []string) (err error)) ExecOption {
   return func(w *ExecWorker) {
      w.onSwitchCharHit = fn
   }
}
2
3
4
5
6
7
# WithOnPassThruCharHit
在命令行参数解析过程中,如果遇到 “--” 字符序列,cmdr 认为是遇到了 passthrough 字符,并且将会停止剩余命令行的解析。在此时,cmdr 同样地会尝试回调。你可以通过 WithOnPassThruCharHit(fn) 指定一个相应的回调函数。其原型为:
// WithOnPassThruCharHit handle the passthrough char(s) (i.e. '--') matched
// For example, type `bin/fluent mx -d -- --help` will trigger this callback at the 2nd flag '--'.
func WithOnPassThruCharHit(fn func(parsed *Command, switchChar string, args []string) (err error)) ExecOption {
   return func(w *ExecWorker) {
      w.onPassThruCharHit = fn
   }
}
2
3
4
5
6
7
# WithAfterArgsParsed
当整个命令行参数全部解析之后,cmdr 会尝试回调,该回调函数可以由 WithAfterArgsParsed(hookProc) 来指定。其原型为:
func WithAfterArgsParsed(hookFunc Handler) ExecOption {
	return func(w *ExecWorker) {
		w.afterArgsParsed = hookFunc
	}
}

type Handler func(cmd *Command, args []string) (err error)
2
3
4
5
6
7
在你的这个回调函数正常返回之后,cmdr 将会尝试执行已经命中的子命令。
# Walking on cmdr Commands Hierarchy Tree
在 cmdr.Exec(...) 的初始阶段,我们会发现全部的命令、标志,并对这些命令标志进行有效性校验,最后为它们建立起完整的关联关系。
在这之后,我们会处理用户输入的命令行,将其映射为 Option Store 中的配置值,最后调用已经识别到的子命令(如果没有子命令,那就是Root命令)的 Action 处理程序。
因此,在你定义的 Action 处理程序中,借助传入的 cmd *Command 参数,你可以回溯所有上级命令直至 Root,同时,也包括每个命令所拥有的标志集合。反过来,从 Root 命令开始,你也能够遍历一切子命令及其标志。
我们已经知道 ~~tree 标志能够以树状结构打印出全部子命令:
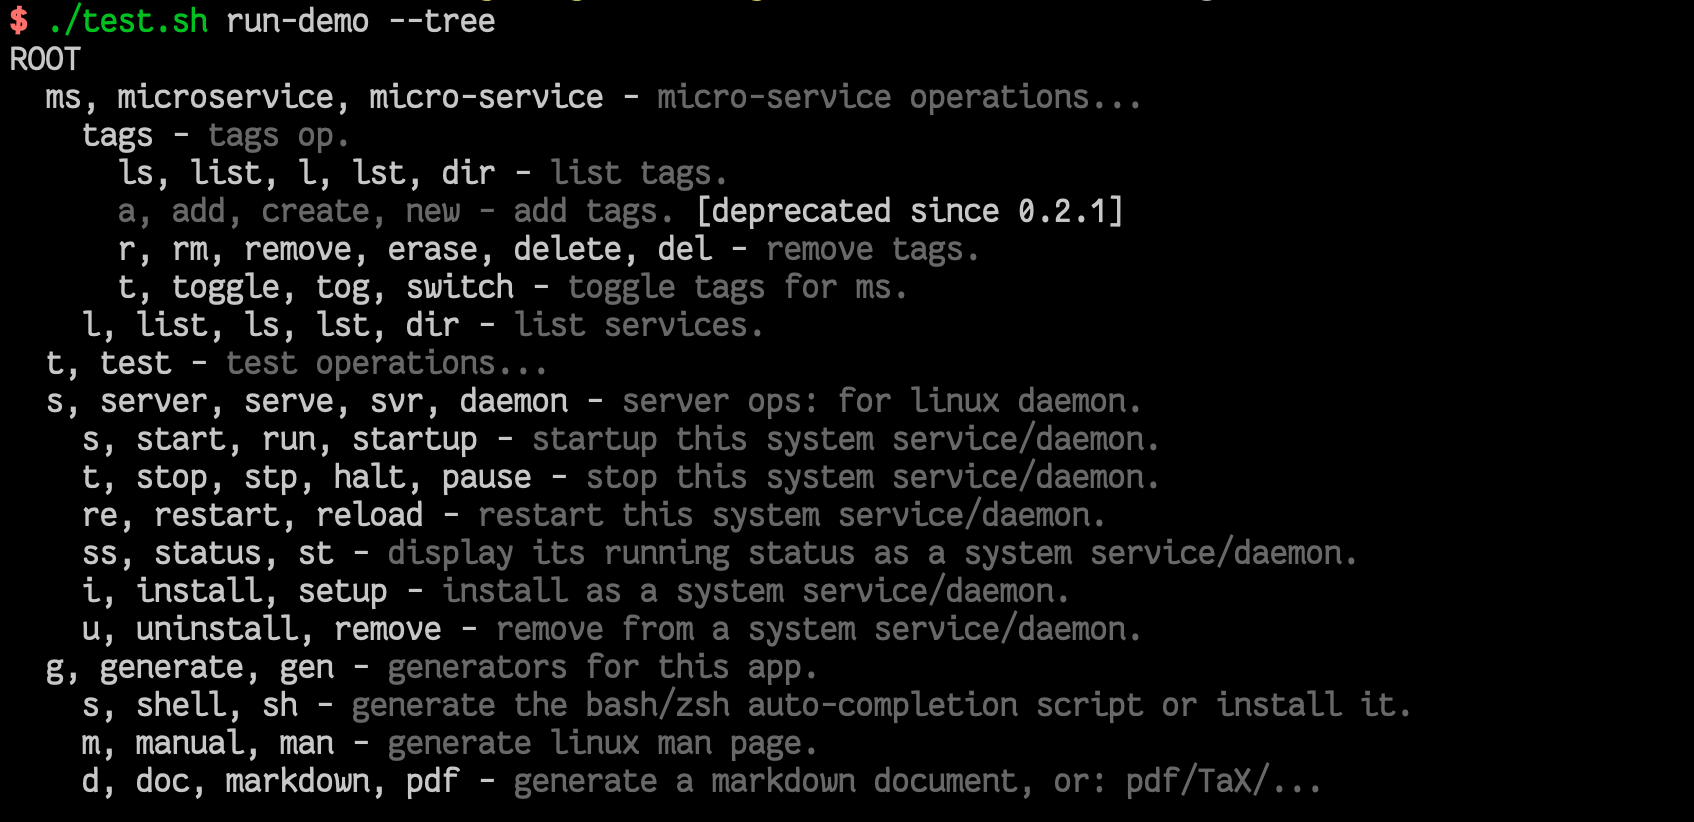
--tree 实际上是利用了 cmdr 内建的 WalkAllCommands() 所提供的遍历方式。
对所有命令及其选项进行遍历,实际上有两种方式:一是利用 Painter 以及相应的内部机制,二是通过 WalkAllCommands 明确地遍历。
# Painter
Painter 是一个接口。它被用在输出帮助屏这个方面。尽管输出帮助屏只是一个小小的功能,但你还是可以自定义它的行为。你可以自行实现 Painter 接口并通过 SetCurrentHelpPainter(painter) 来更改帮助屏的显示内容。
如果你真的想这么做,可以查阅 Painter 的定义,也可以 issue 到我,或许说不定我能够有所建议。
# Walker
WalAllCommands(cmd, index, walker) 是一个更为强大的遍历器,实际上 manpage,markdown 的输出就是通过这个机制来实现的。利用这个遍历器,你可以便利整个命令集的树状结构。一般来说,你应该给它传递 cmd=nil, index=0 的参数值来开始你的遍历,这表示将会从顶级命令开始遍历,而且将其视作第 0 层。index 这个参数将会在遍历器递归时自动修正到符合层级计数,然后会被传递给 walker。我只是懒得将它改成 level 名字了,它就是那个用途。
例如 --tree 的实现源代码如下:
func dumpTreeForAllCommands(cmd *Command, args []string) (err error) {
	command := &rootCommand.Command
	_ = walkFromCommand(command, 0, func(cmd *Command, index int) (e error) {
		if cmd.Hidden {
			return
		}

		deep := findDepth(cmd) - 1
		if deep == 0 {
			fmt.Println("ROOT")
		} else {
			sp := strings.Repeat("  ", deep)
			// fmt.Printf("%s%v - \x1b[%dm\x1b[%dm%s\x1b[0m\n",
			// 	sp, cmd.GetTitleNames(),
			// 	BgNormal, CurrentDescColor, cmd.Description)

			if len(cmd.Deprecated) > 0 {
				fmt.Printf("%s\x1b[%dm\x1b[%dm%s - %s\x1b[0m [deprecated since %v]\n",
					sp, BgNormal, CurrentDescColor, cmd.GetTitleNames(), cmd.Description,
					cmd.Deprecated)
			} else {
				fmt.Printf("%s%s - \x1b[%dm\x1b[%dm%s\x1b[0m\n",
					sp, cmd.GetTitleNames(), BgNormal, CurrentDescColor, cmd.Description)
			}
		}
		return
	})
	return ErrShouldBeStopException
}
2
3
4
5
6
7
8
9
10
11
12
13
14
15
16
17
18
19
20
21
22
23
24
25
26
27
28
29
# 比较
可以想象到你能够借助这个遍历器实现某些更强大的特性,在具备遍历能力的基础上,我们其实可以设计更强大的命令行界面结构,而不必担心过分复杂带来的负面效果。
关于如何设计命令行界面的体系结构,保持其清晰性,这个不是我们再这个系列文章中要讨论的话题。
至于 Painter 和 Walker,其区别也很明显。Painter 是被限定在帮助屏构造层面的,且不会递归下去,除非你想自行实现。Walker 是全局层面的递归遍历器,面向的是所有的命令。
# 动态扩充命令
# _1. Extensions 子命令分组
可参考:子命令 - Extentsions 子命令分组 有关章节
since v1.7.21
# _2. 通过 Golang 插件机制进行扩充
since v1.7.23
现在 cmdr 已经支持所谓的 cmdr-addons 了,你可以通过 cmdr 提供的插件接口 cmdr-base/plugin.go (opens new window) 来编写一个 Golang Plugin,从而允许在主程序的基础上动态地扩充命令。
请勿与
cmdr-addons(opens new window) 项目相混淆,cmdr-addons 项目是一个 GitHub repository,提供一些对 cmdr 进行增强的特性,例如dex守护进程支持,等等。
由于 cmdr-addons 的相关接口具备更精细的定义能力,因此这种方式允许你扩充完全支持 cmdr 各种特性的子命令层级以及附带的任意标志集合。
# Golang 插件接口
在 cmdr-base 项目中,插件接口具有如下的定义:
package cmdrplugin

// PluginEntry entry of an addon (golang plugin)
type PluginEntry interface {
	PluginCmd
	AddonTitle() string
	AddonDescription() string
	AddonCopyright() string
	AddonVersion() string
}

// PluginCompBase component for cmd and flag of an addon
type PluginCompBase interface {
	Name() string
	ShortName() string
	Aliases() []string
	Description() string
}

// PluginCmd a command of an addon
type PluginCmd interface {
	PluginCompBase
	SubCommands() []PluginCmd
	Flags() []PluginFlag
	Action(args []string) (err error)
}

// PluginFlag a flag of a command of an addon
type PluginFlag interface {
	PluginCompBase
	DefaultValue() interface{}
	PlaceHolder() string
	Action() (err error) // onSet
}
2
3
4
5
6
7
8
9
10
11
12
13
14
15
16
17
18
19
20
21
22
23
24
25
26
27
28
29
30
31
32
33
34
# 编写你的 cmdr-addon
请参考 plugin/demo/demo_addon.go (opens new window):
package main

import (
	"fmt"
	"github.com/hedzr/cmdr"
	cmdrbase "github.com/hedzr/cmdr-base"
)

// NewAddon returns an addon with cmdr.PluginEntry
func NewAddon() cmdrbase.PluginEntry {
	return &addon{
		//
	}
}

type addon struct {
}

func (p *addon) AddonTitle() string       { return "demo addon" }
func (p *addon) AddonDescription() string { return "demo addon desc" }
func (p *addon) AddonCopyright() string   { return "copyright (c) hedzr, 2020" }
func (p *addon) AddonVersion() string     { panic("0.1.1") }
func (p *addon) Name() string             { return "demo" }
func (p *addon) ShortName() string        { return "dx" }
func (p *addon) Aliases() []string        { return nil }
func (p *addon) Description() string      { return "the demo addon for testing purpose" }

func (p *addon) SubCommands() []cmdrbase.PluginCmd {
	return nil
}

func (p *addon) Flags() []cmdrbase.PluginFlag {
	return []cmdrbase.PluginFlag{
		newFlag1(),
	}
}

func (p *addon) Action(args []string) (err error) {
	cmdr.Logger.Infof("hello, args: %v", args)
	fmt.Printf("Logger: %v\n", cmdr.Logger)
	return
}

//

func newFlag1() *flag1 {
	return &flag1{}
}

type flag1 struct{}

func (f *flag1) Name() string              { return "bool-flag" }
func (f *flag1) ShortName() string         { return "bf" }
func (f *flag1) Aliases() []string         { return []string{} }
func (f *flag1) Description() string       { return "a bool flag" }
func (f *flag1) DefaultValue() interface{} { return false }
func (f *flag1) PlaceHolder() string       { return "" }

func (f *flag1) Action() (err error) {
	return
}
2
3
4
5
6
7
8
9
10
11
12
13
14
15
16
17
18
19
20
21
22
23
24
25
26
27
28
29
30
31
32
33
34
35
36
37
38
39
40
41
42
43
44
45
46
47
48
49
50
51
52
53
54
55
56
57
58
59
60
61
# 编译为二进制动态库
Golang 插件使用这样的命令完成编译:
$ go build -v -race -buildmode=plugin -o ./ci/local/share/fluent/addons/demo.so ./plugin/demo
	chmod +x ./ci/local/share/fluent/addons/demo.so
2
对于你的项目而言,我们约定一个 cmdr-addon 的 so 文件可以被放在 ./ci/local/share/fluent/addons/ 之中,cmdr 将会检测到该插件的存在并装入它。这个文件夹适用于开发于调试期间。
对于你的最终发行二进制包来说,这些位置将会被 cmdr 的检测以求寻找符合 cmdr-addon 接口的 *.so 文件:
"./ci/local/share/$APPNAME/addons",
"$HOME/.local/share/$APPNAME/addons",
"$HOME/.$APPNAME/addons",
"/usr/local/share/$APPNAME/addons",
"/usr/share/$APPNAME/addons",
2
3
4
5
你总是可以通过
cmdr.WithPluginLocations(locations ...)来指定想要的搜索路径。
# 运行主程序及 cmdr-addons 扩展
所有被找到的 cmdr-addons 所定义的命令及其标志集合,将被添加到 Addons 命令分组中,如同这样:
而执行这些扩充的命令,和执行以前主程序中的子命令并无任何不同:
$ ./bin/fluent dx

# _3. 通过配置文件定义别名段
since v1.7.25
你当然知道 git 可以通过全局配置文件 .gitconfig 来定义命令别名,这些别名和 git 的内置命令的调用方式是同样的:
$ git config --global alias.co checkout
$ git co master # == git checkout master
2
cmdr 也支持通过配置文件的方式来定义新的命令,并且具有更强大的能力。
在 ./ci/etc/fluent/conf.d/91.cmd-aliases.yml (opens new window) 中,我们为 ./examples/fluent 定义了这样的一组扩充命令:
app:

  aliases:
    group:
    commands:
      - title: ls
        invoke-sh: ls -la -G                # for macOS, -G = --color; for linux: -G = --no-group
        desc: list the current directory
      - title: pwd
        invoke-sh: pwd
        desc: print the current directory
      - title: services
        desc: "the service commands and options"
        subcmds:
          - title: ls
            invoke: /server/list            # invoke a command from the command tree in this app
            invoke-proc:                    # invoke the external commands (via: executable)
            invoke-sh:                      # invoke the external commands (via: shell)
            shell: /bin/bash                # or /usr/bin/env bash|zsh|...
            desc: list the services
          - title: start
            flags: []
            desc: start a service
          - title: stop
            flags: []
            desc: stop a service
          - title: git-version
            invoke-proc: git describe --tags --abbrev=0
            desc: print the git version
            group: Proc
          - title: git-revision
            invoke-proc: git rev-parse --short HEAD
            desc: print the git revision
            group: Proc
          - title: kx1
            invoke: /kb
            desc: invoke /kb command
            group: Internal
          - title: kx2
            invoke: ../.././//kb --size 32mb
            desc: invoke /kb command
            group: Internal
          - title: kx3
            invoke: /kb --size 2kb
            desc: invoke /kb command
            group: Internal
        flags:
          - title: name
            default: noname
            type: string          # bool, string, duration, int, uint, ...
            group:
            toggle-group:
            desc: specify the name of a service
2
3
4
5
6
7
8
9
10
11
12
13
14
15
16
17
18
19
20
21
22
23
24
25
26
27
28
29
30
31
32
33
34
35
36
37
38
39
40
41
42
43
44
45
46
47
48
49
50
51
52
53
54
在这个示例样本中,我们展示了 cmdr 所支持的三种命令执行方式:
- 命令别名
- 可执行文件
- shell 脚本
至于命令相关的标志集合应该怎样定义,请参考 Flag (opens new window) 的 Struct Tags 声明。
这个样本所定义的扩展别名均被列在 Aliases 子命令分组之下,除非你在 app.aliases.group 中另行指定了分组名。
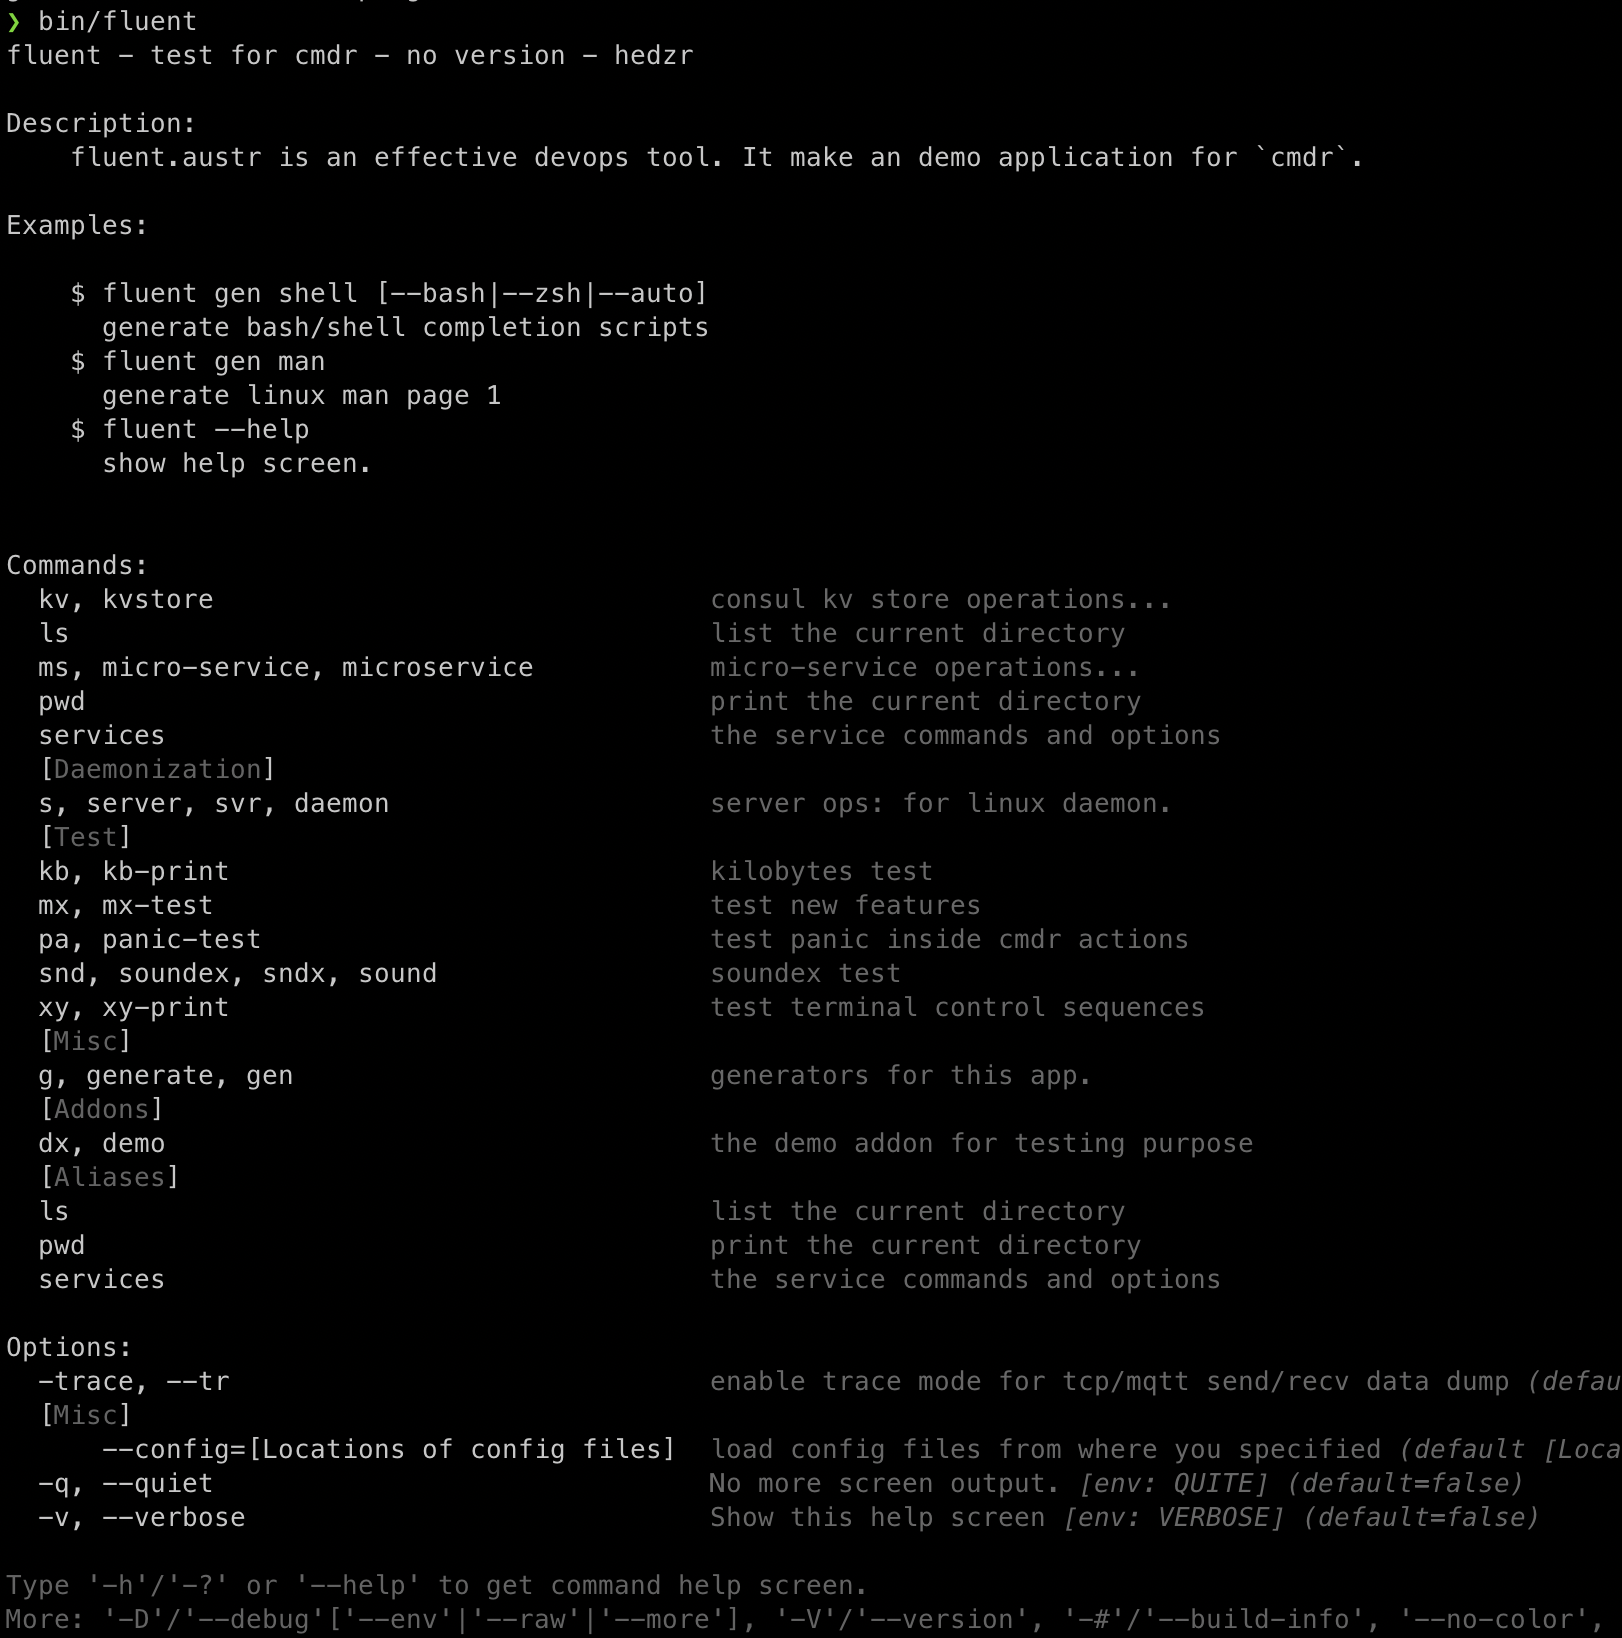
实际运行之后,第一级命令包括:

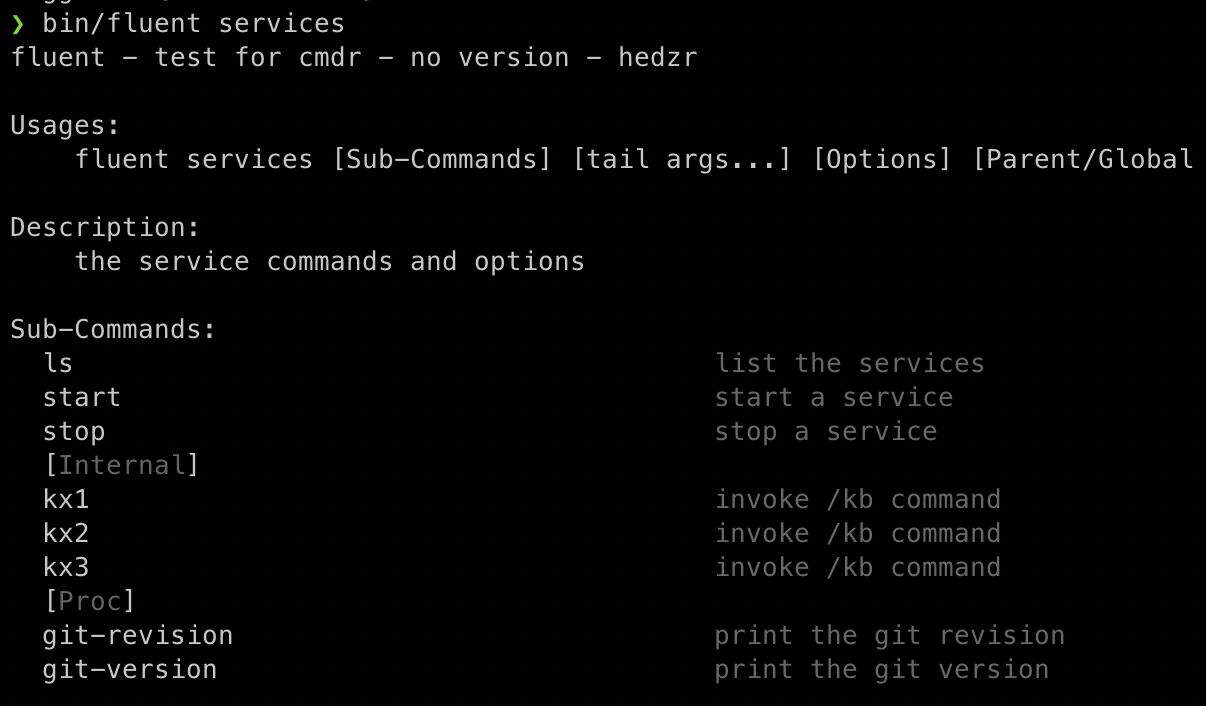
services 子命令还包括嵌套命令:
# 命令别名
命令别名由 invoke 字段定义,如同这样:
          - title: kx1
            invoke: /kb
            desc: invoke /kb command
            group: Internal
          - title: kx2
            invoke: ../.././//kb --size 32mb
            desc: invoke /kb command
            group: Internal
          - title: kx3
            invoke: /kb --size 2kb
            desc: invoke /kb command
            group: Internal
2
3
4
5
6
7
8
9
10
11
12
13
invoke 字段指明的是一个 子命令的路径,"/" 代表根 Root 命令,路径字符串依次定义了每一级子命令的名称(Command.Full)。子命令路径字符串也支持 “." 和 “..”,至于 "//" 所分隔的空命令被忽略不计。
可选地,你可以在子命令路径之后附带一些标志定义。请注意,我们建议你谨慎地在这里使用目标命令的所属标志集,尽管原则上我们并没有任何附加的限制。
例如 fluent 样本示例支持一个顶级命令 “kb” 且允许 --size xxx 标志作为其选项。因此,kx3 这个命令别名将会展开为 "kb" 并且自带 --size 2kb 作为其附加参数。于是别名的执行结果如同这样:

# 可执行文件
你也可以通过 invoke-proc 字段指定执行一个 elf/exe 二进制可执行文件:
          - title: git-version
            invoke-proc: git describe --tags --abbrev=0
            desc: print the git version
            group: Proc
          - title: git-revision
            invoke-proc: git rev-parse --short HEAD
            desc: print the git revision
            group: Proc
2
3
4
5
6
7
8
其执行效果如同这样:

# shell 脚本
通过 invoke-sh 字段指定执行一个 Shell 脚本:
      - title: ls
        invoke-sh: ls -la -G                # for macOS, -G = --color; for linux: -G = --no-group
        desc: list the current directory
      - title: pwd
        invoke-sh: pwd
        desc: print the current directory
2
3
4
5
6
这个方式定义的扩充命令,和通过在 Extensions 文件夹放入 Shell 脚本的效果是等价的,你可以自行决定如何应用。
🔚