
已经写了一篇 谈 C++17 里的 Factory 模式 ,后来又顺便肝了一篇 谈 C++17 里的 Singleton 模式 。看来是得要整一大堆了,对于懒散的人来说这很麻烦。我不知道是不是要打算会写完整个 GoF 的个人理解以及新的的实现,慢慢看吧,做了就做了。
回顾下构建者模式,并应对做类库时遇到的构建者模板类应如何实作的问题。
Prologue
实际上,就我个人而言,真正地运用 builder pattern,反而是在 Java 开发经历中。流式接口也是如此。
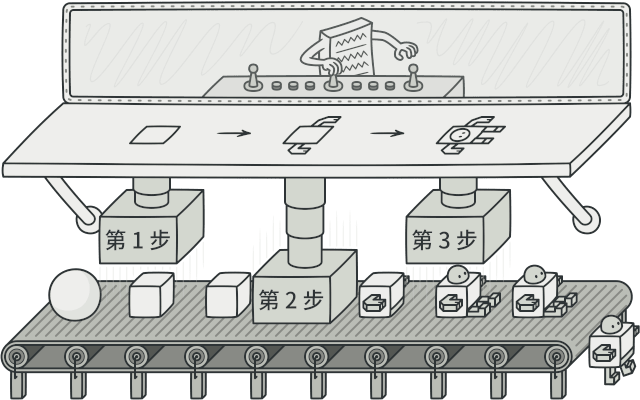
Builder 模式就是为了分步骤构造一个对象用的,看图:
FROM: HERE
虽然很多时候我们都只关心 new 了对象后怎么操作它,但是有的时候有的场景里确实我们只会关心怎么 new 这个对象。这时候就是 Builder 了。
Builder Pattern
理论
Builder 模式是 Creational Patterns 中的一种。在 谈 C++17 里的 Factory 模式 中,我们已经介绍过创建型模式了,所以本文不再赘述了。
构建者模式的意图,就在于让你可以分步骤地构建复杂对象,它允许你使用相同(相似)的创建diamanté生产出不同类型和形式的对象。
对于 Builder 模式来说,一个重要的标志,尽管这并不是规定但却往往约定俗成,就是以一个 .build() 调用作为结束。例如:
1
2
3
4
5
6
7

auto shape = Builder()
  .choose(Shape.Rect)   // choose a factory
  .setColor(COLOR.RED)
  .setBorderWidth(1)
  .setFill(COLOR.GRAY)
  .build();
canva.place(shape, Position.Default);
Builder 模式并非必须得要采用流式接口。
反而在很多时候我们需要和交互对象协商一个选择,并将这个决定设置到 Builder 构造者中。直到全部协商完成之后,才使用 builder.build() 构建出最终产品实例。
如同示例代码中给出的想象,我们还可以糅合 Builder 和 Factory 模式(以及 Proxy 模式或者其它),让一个根本性的 Builder 去调用 concreted 的 FactoryBuilder 来构建多种产品。由于这往往需要较大篇幅的代码才能呈现出风貌,故而不再展开了。
C++ 实现
注意下面的示例都较长。
基本的
下面是一个标准的、基本的 builder pattern 案例。这个案例通过 email 的四个组成元素的分步构造来展示 builder pattern 的典型实现方法。
1
2
3
4
5
6
7
8
9
10
11
12
13
14
15
16
17
18
19
20
21
22
23
24
25
26
27
28
29
30
31
32
33
34
35
36
37
38
39
40
41
42
43
44
45
46
47
48
49
50
51
52
53
54
55
56
57
58
59
60
61
62
63
64
65
66
67
68
69
70
71
72
73
74
75
76
77
78
79
80
81
82
83
84
85
86
87
88
89
90
91
92
93

namespace hicc::dp::builder::basic {

  class email_builder;
  class email {
    public:
    ~email() {}
    friend class email_builder; // the builder can access email's privates
    static email_builder builder();

    std::string to_string() const {
      std::stringstream ss;
      ss << "   from: " << _from
        << "\n     to: " << _to
        << "\nsubject: " << _subject
        << "\n   body: " << _body;
      return ss.str();
    }

    explicit email(std::string const &from, std::string const &to, std::string const &subject, std::string const &body)
      : _from(from)
        , _to(to)
        , _subject(subject)
        , _body(body) {}
    email(email &&o) {
      _from = o._from, _to = o._to, _subject = o._subject, _body = o._body;
    }
    email clone(email &&o) {
      email n{o._from, o._to, o._subject, o._body};
      return n;
    }

    private:
    email() = default; // restrict construction to builder
    std::string _from{}, _to{}, _subject{}, _body{};
  };

  class email_builder {
    public:
    email_builder &from(const std::string &from) {
      _email->_from = from;
      return *this;
    }

    email_builder &to(const std::string &to) {
      _email->_to = to;
      return *this;
    }

    email_builder &subject(const std::string &subject) {
      _email->_subject = subject;
      return *this;
    }

    email_builder &body(const std::string &body) {
      _email->_body = body;
      return *this;
    }

    operator std::unique_ptr<email> &&() {
      return std::move(_email); // notice the move
    }

    auto build() {
      return std::move(_email); // not a best solution since concise is our primary intent
    }

    email_builder()
      : _email(std::make_unique<email>("", "", "", "")) {}

    private:
    std::unique_ptr<email> _email;
  };

  inline email_builder email::builder() { return email_builder(); }
  inline std::ostream &operator<<(std::ostream &os, const email &email) {
    os << email.to_string();
    return os;
  }

} // namespace hicc::dp::builder::basic

void test_builder_basic() {
  using namespace hicc::dp::builder::basic;
  // @formatter:off
  auto mail = email::builder()
    .from("[email protected]")
    .to("[email protected]")
    .subject("About Design Patterns")
    .body("There is a plan to write a book about cxx17 design patterns. It's good?")
    .build();
  std::cout << *mail.get() << '\n';
  // @formatter:on
}
而它的测试代码部分也呈现出了典型的流式调用风格。
示例代码提供了一种编码结构上的刻板手段,即通过 model class::builder() 获得构建者,在最后一步时以 builder.build() 来获得最终的 model class 实例对象。有时候刻板手段是最佳的选择。的确,稍后我们会看到一个 design pattern 其实现方法是可以多种多样的。然而保持编码结构的相似性,将会有利于使用者在探视接口 API 时,尤其是通过 namespace 层级探视可用的接口时,无需额外文档地获得接口使用方法。
所以,代码自己能够说明一切,这是你逃避注释的正确手段。
额外提示
为了因应 Modern C++ 风格,示例代码使用了 unique_ptr 来帮助管理示例。为什么不使用 shared_ptr 呢?因为 shared_ptr 相对来说更沉重,它需要额外管理一套引用计数机制,所以直接使用 unique_ptr 而只在必要时(例如需要在多个容器中托管时)才考虑使用 shared_ptr。
那采用上面的固定范式,但我需要的是 shared_ptr 该怎么办呢,我能够把 unique_ptr 转换成 shared_ptr 语义吗?
这一点,并不是问题,移动语义允许直接传送 u 到 s:
1
2

std::unique_ptr<std::string> unique = std::make_unique<std::string>("test");
std::shared_ptr<std::string> shared = std::move(unique);
甚至于:
1

std::shared_ptr<std::string> shared = std::make_unique<std::string>("test");
所以在 build() 时你可以决定是否做显式的返回类型声明:
1
2

auto obj = builder.build(); // 得到 unique_ptr<T>
std::shared_ptr<T> o = builder.build(); // 隐含一个移动操作
嵌入的
前面的示例中采用了分离的两个独立类的方式,这样显得类的结构以及依赖关系更清晰,但可能稍微有点污染,因为在名字空间中会有一个产品的 builder 类的额外的存在。而一个命名为 models 的 namespace 中是不应该有非 Model 的其它东西——helpers 也好,utilities 也好——的存在的。因此,特别是在 metaprogramming 中,更倾向于将 builder class 直接嵌入 product class 中:
1
2
3
4
5
6
7
8
9
10
11
12
13
14
15
16
17
18
19
20
21
22
23
24
25
26
27
28
29
30
31
32
33
34
35
36
37
38
39
40
41
42
43
44
45

namespace hicc::dp::builder::embed {

  class email {
    public:
    class builder_impl {
      public:
      builder_impl &from(const std::string &from) {
        _email._from = from;
        return *this;
      }
      // ...
      auto build() {
        return _email;
      }

      private:
      std::unique_ptr<email> _email;
    };

    static builder_impl builder(){
      return builder_impl{};
    }

    public:
    //...

    private:
    email() = default; // restrict construction to builder
    std::string _from, _to, _subject, _body;
  };

} // namespace hicc::dp::builder::embed

void test_builder_embed() {
  using namespace hicc::dp::builder::embed;
  // @formatter:off
  auto mail = email::builder()
    .from("[email protected]")
    .to("[email protected]")
    .subject("About Design Patterns")
    .body("There is a plan to write a book about cxx17 design patterns. It's good?")
    .build();
  std::cout << mail << '\n';
  // @formatter:on
}
使用者几乎没有修订的必要。
它的额外好处在于没有前向参考的额外声明的必要,也无需 friend class 的声明的必要,可以省去不少脑力。
复杂的
然而,builder pattern 并不是非得要有一个 build() 方法来做临门一脚,也并不是非得要采用流式接口不可。下面这个案例也常常出现在相应的 tutor 中,但我们进行了改造。
首先给出产品类部分:
1
2
3
4
5
6
7
8
9
10
11
12
13
14
15
16
17
18
19
20
21
22
23
24
25
26
27
28
29
30
31
32

namespace hicc::dp::builder::complex {

  namespace basis {
    class wheel {
      public:
      int size;
    };

    class engine {
      public:
      int horsepower;
    };

    class body {
      public:
      std::string shape;
    };

    class car {
      public:
      wheel *wheels[4];
      engine *engine;
      body *body;

      void specifications() {
        std::cout << "body:" << body->shape << std::endl;
        std::cout << "engine horsepower:" << engine->horsepower << std::endl;
        std::cout << "tire size:" << wheels[0]->size << "'" << std::endl;
      }
    };
  } // namespace basis
} // namespace hicc::dp::builder::complex
它没什么好说的。
但是它的 builder 会比较复杂,因为这里决定有两种预制的 builder(Jeep 和 Nissan)分别制作不同规格的 Car。所以我们需要一个抽象类的 builder class,以及一个构建样板类 director,实际上你也可以不必分离样板类,充分利用多态性也是可以的:
1
2
3
4
5
6
7
8
9
10
11
12
13
14
15
16
17
18
19
20
21
22
23
24
25
26
27
28
29
30
31
32
33

namespace hicc::dp::builder::complex {

  class builder {
    public:
    virtual basis::wheel *get_wheel() = 0;
    virtual basis::engine *get_engine() = 0;
    virtual basis::body *get_body() = 0;
  };

  class director {
    public:
    void set_builder(builder *b) { _builder = b; }

    basis::car *get_car() {
      basis::car *car = new basis::car();

      car->body = _builder->get_body();

      car->engine = _builder->get_engine();

      car->wheels[0] = _builder->get_wheel();
      car->wheels[1] = _builder->get_wheel();
      car->wheels[2] = _builder->get_wheel();
      car->wheels[3] = _builder->get_wheel();

      return car;
    }

    private:
    builder *_builder;
  };

} // namespace hicc::dp::builder::complex
样板类决定了构建 Car 的标准样板。
如果你确实采用了在抽象类 builder class 中直接实现 get_car() 的代码逻辑,并且使其 virtual 化(这并不是必须的)的话,那么这套做法实际上也引用了模板方法模式(Template Method Pattern)。
模板方法模式(Template Method Pattern)在超类中定义了一个算法的框架, 允许子类在不修改结构的情况下重写算法的特定步骤。
接下来,是具体实现两个 builder 类了:
1
2
3
4
5
6
7
8
9
10
11
12
13
14
15
16
17
18
19
20
21
22
23
24
25
26
27
28
29
30
31
32
33
34
35
36
37
38
39
40
41
42
43
44
45

namespace hicc::dp::builder::complex {

  class jeep_builder : public builder {
    public:
    basis::wheel *get_wheel() {
      basis::wheel *wheel = new basis::wheel();
      wheel->size = 22;
      return wheel;
    }

    basis::engine *get_engine() {
      basis::engine *engine = new basis::engine();
      engine->horsepower = 400;
      return engine;
    }

    basis::body *get_body() {
      basis::body *body = new basis::body();
      body->shape = "SUV";
      return body;
    }
  };

  class nissan_builder : public builder {
    public:
    basis::wheel *get_wheel() {
      basis::wheel *wheel = new basis::wheel();
      wheel->size = 16;
      return wheel;
    }

    basis::engine *get_engine() {
      basis::engine *engine = new basis::engine();
      engine->horsepower = 85;
      return engine;
    }

    basis::body *get_body() {
      basis::body *body = new basis::body();
      body->shape = "hatchback";
      return body;
    }
  };

} // namespace hicc::dp::builder::complex
以及,它的测试代码:
1
2
3
4
5
6
7
8
9
10
11
12
13
14
15
16
17
18
19
20
21
22
23
24
25
26

void test_builder_complex() {
  using namespace hicc::dp::builder::complex;

  basis::car *car; // Final product

  /* A director who controls the process */
  director d;

  /* Concrete builders */
  jeep_builder jb;
  nissan_builder nb;

  /* Build a Jeep */
  std::cout << "Jeep" << std::endl;
  d.set_builder(&jb); // using JeepBuilder instance
  car = d.get_car();
  car->specifications();

  std::cout << std::endl;

  /* Build a Nissan */
  std::cout << "Nissan" << std::endl;
  d.set_builder(&nb); // using NissanBuilder instance
  car = d.get_car();
  car->specifications();
}
注意 Car 由很多部件组合,每个部件也可能有很复杂的构建步骤。
优化
当然啰,这个示例仅仅只是示例。在真实世界里,这个示例的实现可以将 jeep_builder 和 nissan_builder 抽出一个公共的基类:
1
2
3
4
5
6
7
8
9
10
11
12
13
14
15
16
17
18
19
20
21
22
23
24
25
26

class managed_builder : public builder {
  public:
  basis::wheel *get_wheel() {
    basis::wheel *wheel = new basis::wheel();
    wheel->size = wheel_size;
    return wheel;
  }

  basis::engine *get_engine() {
    basis::engine *engine = new basis::engine();
    engine->horsepower = engine_horsepower;
    return engine;
  }

  basis::body *get_body() {
    basis::body *body = new basis::body();
    body->shape = body_shape;
    return body;
  }

  managed_builder(int ws, int hp, const char *s = "SUV")
    : wheel_size(ws), engine_horsepower(hp), body_shape(s) {}
  int wheel_size;
  int engine_horsepower;
  std::string_view body_shape;
};
不但有利于消除重复代码片段,而且更能应对将来的扩展,万一想要 BMW 呢。
进一步地泛型化
其实也可以使用模板类的方式:
1
2
3
4
5
6
7
8
9
10
11
12
13
14
15
16
17
18
19
20
21
22
23
24
25
26
27
28
29
30
31
32
33
34
35
36

template<int wheel_size, int engine_horsepower, char const *const body_shape>
class generic_builder : public builder {
  public:
  basis::wheel *get_wheel() {
    basis::wheel *wheel = new basis::wheel();
    wheel->size = wheel_size;
    return wheel;
  }

  basis::engine *get_engine() {
    basis::engine *engine = new basis::engine();
    engine->horsepower = engine_horsepower;
    return engine;
  }

  basis::body *get_body() {
    basis::body *body = new basis::body();
    body->shape = body_shape;
    return body;
  }
};

constexpr const char suv_str[] = {"SUV"};
constexpr const char hatchback_str[] = {"hatchback"};

class jeep_builder : public generic_builder<22, 400, suv_str> {
  public:
  jeep_builder()
    : generic_builder<22, 400, suv_str>() {}
};

class nissan_builder : public generic_builder<16, 85, hatchback_str> {
  public:
  nissan_builder()
    : generic_builder<16, 85, hatchback_str>() {}
};
这里使用了 constexpr const char suv_str[] 这种技巧,它使得我们能够设法在模板参数中直接传递字符串的字面量,于是上面的代码就完整地模板化了。
如果你已经开始使用 C++20 了,那么 std::basic_fixed_string 能够让你获得直接传递字符串字面量的能力:
1
2
3
4
5
6
7
8
9
10
11
12

template<int wheel_size, int engine_horsepower, char const *const body_shape>
class generic_builder : public builder {
  // ...
};

class jeep_builder : public generic_builder<22, 400, "SUV"> {
  public:
};

class nissan_builder : public generic_builder<16, 85, "hatchback"> {
  public:
};
如果感兴趣完整源代码,可以去查阅相关源码 dp-builder.cc。
元编程中的 Builder Pattern
刚刚我们提前讲述了泛型化一个 builder 的工作,但那只是做了一点初阶的重构而已。而当在模板类体系中需要使用 Builder Pattern 时,情况有一点点变化,特别是当对 builder 的公用代码向上抽出为一个单一的基类时,我们需要 CRTP 技术的介入。
CRTP
CRTP 是一种 C++ 惯用法,它比 C++11 出生的早得多。在 Visual C++ 年代,ATL,WTL 以及少量的 MFC 均大规模地使用了这种技术,后来的 ProfUIS 也如此。
简单地说,CRTP 的目的在于实现编译期的多态绑定,实现方法是向基类的模板参数中传入派生类类名,于是基类就能够借助 static_cast<derived_t>(*this*) 语法来获得派生类的“多态”的操作能力了:
1
2
3
4
5
6
7
8
9
10
11
12
13
14
15
16
17

template <typename derived_t>
class base{
  public:
  void do_sth(){
    static_cast<derived_t>(*this*)->show();
  }
  void show(){hicc_debug("base::show");}
};

template <typename T>
class derived: public base<derived> {
  public:
  T t{};
  void show(){
    hicc_debug("t: %s", hicc::to_string(t).c_str());
  }
};
可继承的 builder pattern
理解 CRTP 技术之后,这里仅仅给出一个示意性的片段:
1
2
3
4
5
6
7
8
9
10
11
12
13
14
15
16
17
18
19
20
21
22
23
24
25
26
27
28
29
30
31
32
33
34
35
36
37
38
39
40
41

namespace hicc::dp::builder::meta {
    class builder_base {
    public:
        builder_base &set_a() {
            return (*this);
        }

        builder_base& on_set_b(){
            return (*this);
        }
    };

    template<typename derived_t, typename T>
    class builder : public builder_base {
    public:
        derived_t &set_a() {
            return *static_cast<derived_t *>(this);
        }
        derived_t &set_b() {
            return *static_cast<derived_t *>(this);
        }

        std::unique_ptr<T> t{}; // the temporary object for builder constructing...

        // ... more
    };

    template<typename T>
    class jeep_builder : public builder<jeep_builder<T>, T> {
    public:
        jeep_builder &set_a() {
            return *this;
        }
    };
} // namespace hicc::dp::builder::meta

void test_builder_meta() {
    using namespace hicc::dp::builder::meta;
    jeep_builder<int> b{};
    b.set_a();
}
在代码中,return *static_case<derived_t*>(this) 可以保证总是返回 derived_t& 参考,这就能够保证从派生类中发起的链式调用 jeep_builder().set_a() 能够正确地调用派生类的重载版本(也是一个覆盖式、擦除式的版本),所以不使用 virtual function 的情况下仍能够正确(模拟)多态。
Epilogue
少数的特性有赖于 cxx17 以上的语法支持,但不是必需品。
![]()

留下评论